Starting the Day on a Positive Note ~ Breakfast Parfaits with Cherry-Apple Compote and Grainless Granola
Breakfast. It's probably the most abused meal of the day, and yet, it shapes the way the day begins. Before the hectic, fast-paced lifestyle is thrust into high gear, I like to sit down to a healthy meal, break the fast, and take time to be thankful for the day. This is one of my ways to mentally prepare for the day that lies ahead of me, and start it on a positive note.
This can be very difficult to do though. Let's face it. There are some mornings when we just don't have time to invest in making an elaborate breakfast. I get that. So where do we turn when we need something quick and no more complicated than a bowl of cereal? Ladies and gentlemen, I present to you these lovely yogurt parfaits. Not only is the grainless granola and cherry-apple compote extremely simple to make, but both of these toppings can be made ahead so that they are ready to rock and roll as soon as you are. That's what I call real fast food.
This time of year, we have an abundance of tart frozen cherries in our freezer, thanks to my family's diligent picking, pitting, and preserving accomplished over the summer. Although you simply cannot beat freshly picked, tree-ripened fruit, having these succulent little gems all through the winter helps to keep my eagerness for the next harvest at bay. I really love the sweet-tart punch they give when they burst in your mouth. It's enough to make your mouth water.
As for the grain-less granola, there are some days when my body just wants a break from the typical over-abundance of grains at breakfast time. Although it may be better classified as a "crumble" rather than a granola, it is so simple and a snap to make. Whenever I buy a large quantity of raw nuts, I always soak them all day in salt water, and then dry them all night in a warm oven. This procedure not only makes any nut taste ten times better, but also removes any unnoticeable mold that is most likely lingering on the nuts, unbeknownst to you. Plus it makes the nuts more digestible. I highly recommend this practice, it's a win-win situation.
One last note about these toppings. In the unlikely event that you get tired of eating the compote and granola with yogurt, it is also splendidly delicious over pancakes, oatmeal, ice cream, and the list goes on. Be creative, be healthy, and take time to indulge in a healthy breakfast!
Cherry-Apple Compote
Makes approximately 1 pint
2 cups pitted tart cherries, thawed and rinsed if frozen
1 apple, washed and diced
1/4 cup maple syrup
1/4 cup water
zest and juice from one clementine
pinch of salt
Combine all ingredients together in a medium saucepan and simmer over medium heat until cherries are plump and liquid has reduced to a syrup-like consistency, about 20 minutes. Keep in refrigerator for up to 1 week.
Grainless Granola
Makes approximately 2 cups
1/2 cup shredded unsweetened coconut
1/2 cup raw almonds
1/2 cup raw walnuts
4-6 soft medjool dates
Optional add-ins - chia, flax, or hemp seeds, dried fruit, etc.
Preheat oven to 400 degrees. Combine nuts and coconut in a pan and toast in the oven until fragrant and golden, 8-10 minutes. Remove and let cool slightly. Combine nut mixture with dates in a food processor and pulse until a few large chunks remain. Store in an airtight container in the refrigerator for up to 2 weeks.
For the Parfaits:
Simply layer the compote and granola with your favorite yogurt (my favorite is plain Greek yogurt with a hint of vanilla).
With Love,
Angie
Winter Comfort Food Meets Nourishment - Buttery Greens atop Braised Black-Eyed Peas and Chicken
This time of year, when the snow is falling, the wind gushing, and the cold biting, I find that my body craves foods that are hearty, rich, and nourishing. In other words, comfort foods. When I was younger, the term "comfort foods" had a slightly different meaning than it does to me now. It definitely meant rich, but nourishing? Not so much. As I have gotten older, my taste for real and healthy foods has proliferated, and the nourishing aspect is a key component in my style of cooking. This dish is a reflection of that concept.
On its own, this stew is delicious, but in order to satisfy my cravings for richly-dark leafy greens, I topped it all of with soft, buttery kale. Not only did this help the nutrition aspect, but also made the stew look ten times more appetizing. The minor bitterness that kale bears was balanced with the sweetness from the carrots and fennel in the stew. A perfect match.
I like to think that I kept things simple with this recipe, although it's important to note that one person's definition of simple can be vastly different than another's definition. Nonetheless, this dish is easy to prepare. Just make sure you plan ahead, as you must soak the black-eyed peas overnight, and cook the dish for several hours.
Braised Chicken and Black-Eyed Peas with Buttery Greens
Serves 2-3 People
1 cup dried black-eyed peas, soaked overnight
1 Tbsp. olive oil
1 small onion, sliced thinly, and roughly chopped
2 medium carrots, peeled and diced
6 large cloves garlic, minced
2 quarts chicken stock (homemade if possible)
1 bay leaf
1/4 tsp. fennel (anise) seeds (I used slightly more)
1 1/2 tsp. cornstarch dissolved in 1 Tbsp. water
1 cup cooked chicken, shredded
salt and pepper to taste
3 cups loosely-packed kale or other greens
1 Tbsp. olive oil
2 Tbsp. chicken stock
1 Tbsp. butter
salt and pepper to taste
In a medium pot, heat olive oil over medium heat and saute onions until translucent. Add garlic, carrots, and saute a few minutes more. Next add black-eyed peas, stock, and spices, and simmer with lid on for about 45 minutes, until peas are tender. Once the peas are tender, add the chicken and cornstarch mixture, and continue to simmer for 1-1 1/2 hours, until the liquid has thickened. Season with salt and pepper.
About a half hour before the peas are done, roughly chop and rinse the kale. In a large saute pan, cook the kale in olive oil until bright green, about 2 minutes. Add the chicken stock, and cook with lid on until soft. Just before serving, add butter, salt, and pepper.
When ready to serve, ladle hot black-eyed peas and chicken into bowls, and top with buttery greens.
Love and Health,
Angie
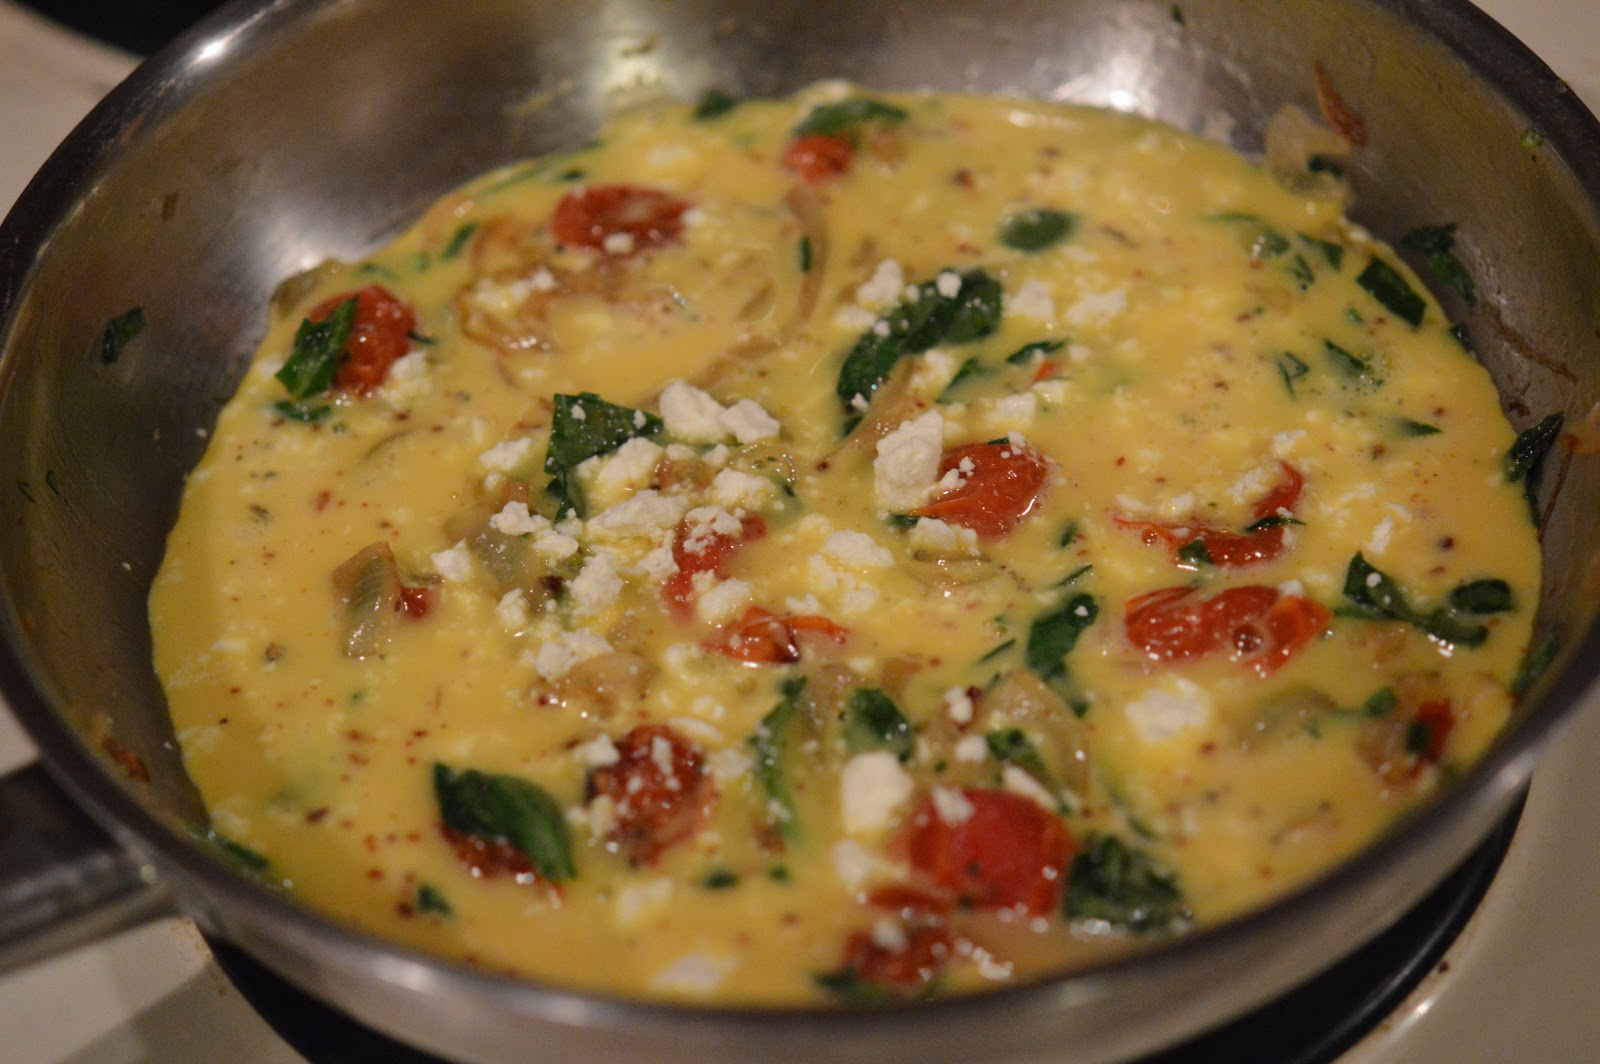
Eggs for Dinner: Frittata with Roasted Tomatoes, Onions, Spinach, and Feta
Eggs have to be one of my favorite last-minute dinner options because, well, they are fast and simple. No fat to trim, no bones to de-bone, no extra time to marinate... you get the idea. You simply crack the thing, and proceed with dinner. Because I was getting a late start on my Monday night dinner duty, eggs seemed to be the ideal option for me. Within twenty minutes, I had two crust-less ham and cheese quiches in the oven, and nestled underneath were some cherry tomatoes, sizzling as they roasted. This dinner was beginning to take shape. All I needed to do now was come up with a vegetable dish to serve along with the quiche and something to do with my succulent roasted tomatoes.
A quick look in the refrigerator solved my dilemma. A caesar salad would be perfect to serve along side my quiche, but a quick look at some fresh spinach and feta cheese and I couldn't resist. I had to make a frittata too. To me, the combination of spinach and feta is glorious on its own, but combine it with roasted tomatoes and caramelized onions in a soft bedding of bakes eggs, and it would be a win kind of night.
1 pint of cherry tomatoes
2 sprigs of fresh thyme
3 cloves of garlic
2 Tbsp. olive oil
salt and pepper to taste
Combine all ingredients in a baking dish and roast at 400 degrees for 25-35 minutes, until tomatoes have burst, and start to brown lightly.
For the Frittata:
1 Tbsp. olive oil
A handful of roasted tomatoes
2/3 cup chopped spinach
1/2 Tbsp. butter
1-3 Tbsp. crumbled feta cheese
3 eggs
2 Tbsp. whipping cream
salt, pepper, fresh herbs and seasonings of your choice (I use LOTS of Italian seasonings)
Preheat your oven to 400 degrees. In a small saute pan, cook the onions in olive oil over medium-low heat until they begin to caramelize. Meanwhile, whisk together the eggs, whipping cream, and seasonings and set aside. Next, add the tomatoes and spinach to the onions, and coat the sides of the pan with the butter, so that your frittata does not stick to the pan. Gently pour the egg mixture over the vegetables, and sprinkle the cheese over top. By now, the eggs should have set on the bottom, so that the edges don't jiggle. Now, place the frittata in the oven and bake just until the center is set, about 8-12 minutes. Once set, loose around the edges with a spatula, and serve immediately.
One last note. After several years of wanting to upgrade to an SLR camera, I finally did. Oh my, am I happy that I did! It will probably take me all year to figure out how to use it, but I am so eager and excited to learn. I want to thank my amazing Grandpa, who took the time to help me do the research, figure out exactly what to get, and go shopping with me. I am so blessed to have such an incredible man in my life.
Simple Snacks: Sweet Potato Dollars
When it comes to snacks, it's so easy to reach for a bag of tortilla chips or pretzels to satisfy your stomach, especially if you're like me and have the mind set of "I want it, and I want it now." But what if we were to take a deep breath, calm down, and take the time to prepare something that would both satisfy and nourish our body at the same time? This is the mind set I am trying to adapt to right now. This is where these crisp-on-the-outside-soft-in-the-center sweet potato dollars come in; they're so easy and quick to prepare, yet packed with loads of vitamins. Did I mention that kids love them too?
Today I tried something new by adding them to my salad for lunch. Whoa buddy! As soon as I took the first bite, my taste buds were having a party. Combined with avocado, pine nuts, pomegranate seeds and spinach dressed in a lemon vinaigrette, I found a new favorite salad combination. In fact, I was so enthralled with my lunch that I didn't take the time to take a proper picture! I did however manage to take one on my phone before devouring it. My apologies for the lower quality picture.
Anyway, as with most recipes, it is important to remember that you are never confined to a recipe! Try adding lemon juice to the sweet potatoes to have a sweet-tart thing going, or maybe maple syrup and cayenne pepper if you like sweet and spicy, cinnamon and honey? Mmmm, my mouth is watering just thinking about all the flavor possibilities! Like them super crispy? Cut them very thin. Like them on the chewier side? Cut them thicker. I've given you the recipe as a canvas, now go have fun and paint your picture!
Sweet Potato Dollars
This recipe is originally from the book Nourishing Traditions by Sally Fallon, New Trends Publishing Inc., Washington D.C., 2001
Makes about 4 servings
3-4 long, skinny sweet potatoes
3 Tbsp. butter, melted
3 Tbsp. olive oil
sea salt to taste
Slice sweet potatoes thinly, a little thinner than a 1/4 of an inch thick. Arrange the slices on a buttered baking sheet and brush each slice with a *mixture of the butter and olive oil. Sprinkle with salt to your liking, and bake at 350 degrees for 45 minutes to an hour.
*If you are adding any other flavors, it is best to add them to the butter mixture before brushing the slices.
Love,
Angie
Soup Time ~ Irish Chicken Soup with a Twist
With the hurricane brewing on the east coast, the weather around here has been so dreary. My thoughts have been with the people who have and are facing much worse conditions than here in Ohio. Even though the sun has hardly shown up the past few days, I must admit that I enjoy this kind of rainy weather. There's something comforting about a rainy day. When I have the opportunity to stay home and cook on a rainy day, you will find me in the kitchen with the Frank Sinatra station on Pandora, as happy as can be, most likely making a big pot of soup. Those are the days I love most.
Soups are definitely one of my favorite things to cook, mainly because they are so easy and delicious, but also because a nice mug of soup on a chilly and wet day is hard to beat. This particular soup is one I started making last winter. My family, particularly my dad, loves this creamy and hearty soup. I love it because it is so nourishing. Unlike traditional Irish chicken soup, I use sweet potatoes instead of regular potatoes for the higher nutrient content. With all the orange color going on, this soup contains loads of betacarotene which is great for your skin, protects against cancer, colds, infections, and diseases. When I feel a cold coming on, this is the soup I make.
Like most soups, this soup will taste even better the next day after the flavors have had a chance to combine.
2 Tbsp. olive oil
1 small onion, diced
1 stalk of celery, diced
3 large carrots, diced
1 clove of garlic, minced
1 large sweet potato, diced
2 chicken breasts, shredded
5 cups chicken stock, preferably homemade
salt and pepper to taste
In a large pot sauté the onion and celery in the oil until soft, about five minutes. Add carrot, garlic, and sweet potato; continue to cook about five minutes longer. Add stock and bring to a boil; reduce to a simmer and cover and cook for about an hour, until the sweet potato cubes are easily pierced with a fork. Puree two-thirds of the soup in a blender, and pour blended soup back into pot. Add the chicken, and season to taste.
Chocolate Gingerbread Cake with Orange-Scented Whipped Cream
Ok friends, you are in for a treat today. Last night, when I should have been sleeping, I was restlessly lying in my bed thinking about this cake. Orange, ginger, and chocolate. Seriously, this is a magical combination! I love gingerbread, but combining it with chocolate?! I couldn't wait to try it. As I developed the recipe for the cake I noticed a basket of oranges sitting on the counter, and it struck me that orange zest in the whipped cream atop the cake would be heavenly. Oh was I right! My heart was leaping at the idea of tasting this delicious dessert as it was baking. Upon tasting the first bite, I realized my restlessness had not been in vain; it was so tasty.
In addition, this is not your typical over-the-top rich kind of cake. Although it is a dessert, and should be eaten in moderation, it is healthier and more nourishing than the average cake. I used only natural sweeteners, along with freshly ground whole wheat flour to add more nutrients. If you do not have a grain mill at home, I suggest using unbleached white flour, as store-bought wheat flour tends to be bitter. I also used non-homogenized, and not ultra-pasteurized, whipping cream to make the whipped cream, because it contains more of the beneficial "good stuff" for our bodies. I hope you enjoy this cake as much as I did!
Chocolate Ginger Bread Cake with Orange Scented Whipped Cream
For the Cake:
1/2 cup butter, softened
1/2 cup honey
1/2 cup molasses (not blackstrap)
2 eggs, room temperature
1 1/2 tsp. vanilla
1 Tbsp. plus 1 tsp. freshly grated ginger
2 cups flour
1/2 cup cocoa powder
2 tsp. baking soda
1/2 tsp. sea salt
1/2 tsp. cinnamon
3/4 cup full-fat buttermilk
1/2 cup whole milk
Preheat oven to 350 degrees Fahrenheit and butter and flour a 9-inch bundt pan. In the bowl of an electric mixer, cream together the butter, honey, and molasses. Add eggs, one at a time, scraping down the bowl occasionally. Stir in the vanilla and ginger. In a medium bowl, mix the remaining dry ingredients together; fold into butter mixture. Once combined, stir in the milks, and beat at medium high speed for two minutes. Scrape batter into prepared pan, and bake for 45-50 minutes, until tester inserted comes out clean, and cake springs back slightly when touched.
For the Whipped Cream:
1 1/2 cups whipping cream
zest of one orange
honey to taste (I think I used about 1 1/2 Tbsp.)
Whip all ingredients together and place a generous amount atop each piece of cake. Go sit down, relax, and enjoy while you indulge in the moment.
With Love,
~Angie
Harvest Time ~ Baked Honey and Spice Apple Chips
My favorite time of year has decided to set in. The breath-taking color change in the leaves, the cool breeze that rustles through the trees, bonfires with family and friends, and best of all, it's harvest time! Apple harvest time that is. Picking your own anything is exciting, but walking through an orchard and picking your own apples is just too much fun, especially when you can shake the hand of the farmer who grew your food. Be sure to take advantage of your local orchard this fall; get out and go pick some apples!
When you get home from the farm with your muddy shoes and bags of apples, try making these delicious apple chips! They are bursting with flavor, and make a quick and healthy snack. Baking them gives them their crunchy and crisp texture, but you could also dehydrate them if desired. Be sure to leave the skins on the apples, since most of the nutrients are contained in the skin!
Baked Honey and Spice Apple Chips
3 large apples (I like more tart apples such as Jonathon, Suncrisp, or Goldrush)
Juice of one lemon
1/2 tsp. cinnamon
2 tsp. honey
1/4 tsp. nutmeg (preferably freshly grated)
dash of sea salt
touch of vanilla
1. Slice apples as thinly as you can; the thinner the slice, the crisper the finished product will be. Place slices in a large bowl.
2. Mix remaining ingredients in a small bowl; coat apple slices with honey mixture.
3. Align in a single layer on a parchment-lined baking sheet and bake at 225 degrees for an hour. Turn slices over, and continue to bake for another hour or so, until dry and crisp.
Happy Fall!
~Angie
Subscribe to:
Posts (Atom)